
Lumbar Disc Herniation
Herniated Disk Rehabilitation Exercises
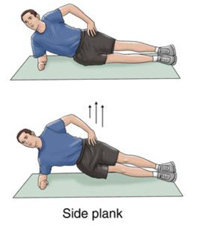
Side Plank:
Lie on your side with your legs, hips, and shoulders in a straight line. Prop yourself up onto your forearm so your elbow is directly under your shoulder. Lift your hips off the floor and balance on your forearm and the outside of your foot. Try to hold this position for 15 seconds, then slowly lower your hip to the ground. Switch sides and repeat. Work up to holding for 1 minute or longer. This exercise can be made easier by starting with your knees and hips flexed to 45 degree angles.
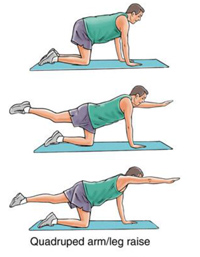
Quadruped arm/leg raise:
Get down on your hands and knees. Tighten your abdominal muscles to stiffen your spine. While keeping your abdominals tight, raise one arm and the opposite leg away from you. Hold this position for 5 seconds. Lower your arm and leg slowly and alternate sides. Do this 10 times on each side.
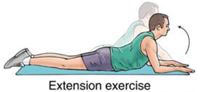
Extension exercise:
Lie face down on the floor for 5 minutes. If this hurts too much, lie face down with a pillow under your stomach. This should relieve your leg or back pain. When you can lie on your stomach for 5 minutes without a pillow, then you can continue with the rest of this exercise.
- After lying on your stomach for 5 minutes, prop yourself up on your elbows for another 5 minutes. Lie flat again for 1 minute, then press down on your hands and extend your elbows while keeping your hips flat on the floor. Hold for 1 second and lower yourself to the floor. Repeat 10 times. Do 4 sets. Rest for 2 minutes between sets. You should have no pain in your legs when you do this, but it is normal to feel pain in your lower back. Do this several times a day
Step 1
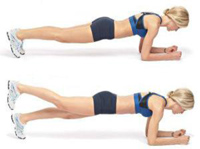
Starting Position: Lie on your stomach on an exercise mat or floor with your elbows close to your sides and directly under your shoulders, palms down and fingers facing forward. Engage your abdominal/core muscles. It should feel like you are tightening a corset around your ribs, waist and lower torso. Contract your thigh muscles to straighten your legs strongly and flex your ankles, (tucking your toes towards your shins).
Step 2
Upward Phase. Slowly lift your torso and thighs off the floor or mat. Keep your torso and legs rigid. Do not allow any sagging in your ribcage or low back. Avoid hiking your hips into the air or bending the knees. Keep the shoulders away from the ears (no shrugging). The shoulders should be directly over your elbows with your palms facing down through the entire exercise. Continue to breathe, keeping the abdominals strong while holding this position. Try holding this position for 5 seconds or more.
Step 3
Downward Phase: Keep the torso and legs stiff as you slowly and gently lower your body back towards the mat or floor.
If you experience any pain in the low back with this movement, stop the exercise immediately and consult with your doctor.
GLUT BRIDGE
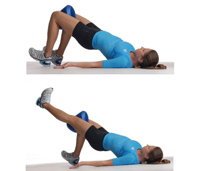
Step 1
Starting Position: Lie on your back on an exercise mat or the floor in a bent-knee position with your feet flat on the floor. Place your feet hip-width apart with the toes facing away from you. Gently contract your abdominal muscles to flatten your low back into the floor. Attempt to maintain this gentle muscle contraction throughout the exercise.
Step 2
Upward Phase: Gently exhale. Keep the abdominals engaged and lift your hips up off the floor. Press your heels into the floor for added stability. Avoid pushing your hips too high, which can cause hyperextension (arching) in your low back. Keeping your abdominals strong helps to prevent excessive arching in the low back.
Step 3
Lowering Phase: Inhale and slowly lower yourself back to your starting position.
Step 4
Progression: Gradually progress this exercise by starting with both feet together and extending one leg while in the raised position.
Avoid arching your low back as you press your hips upward, which normally occurs if you attempt to push your hips as high as possible. This can be achieved by contracting your abdominal muscles prior to lifting, and keeping them engaged throughout the lift
SIDE PLANK
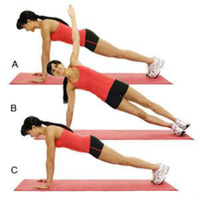
Step 1
Starting Position: Lie on your right side on an exercise mat with your legs straight and the left leg stacked directly on top of the right. Bend the right elbow and place is directly under your shoulder. Align your head with your spine and keep your hips and right knee in contact with the exercise mat.
Step 2
Upward Phase: Exhale, keep the abdominals engaged to brace your spine. Lift your hips and knees off the mat. The side of your right foot stays in contact with the mat. Keep your head aligned with your spine and your right elbow positioned directly under your shoulder.
Step 3
Lowering Phase: Inhale and gently return to your starting position. After a prescribed number of repetitions, repeat on the other side.
Step 4
Exercise Variation: You can increase the intensity of this exercise by (1) increasing the length of time you are in the raised position, (2) raising the upper leg off the lower leg or (3) raising the lower leg off the floor and maintaining contact with your elbow and the foot of the upper leg only.
When raising the upper leg off the lower leg, there is no need to raise it to a level beyond parallel with the floor.